
- To add or delete lots to/from your siteplan, go to “Communities” and select the community you need to work in, then click “Siteplan.” All of your siteplans for that community will display below. Click the pencil icon (edit) for the siteplan you want to work with.

- This will bring up the screen where you can edit the details of your siteplan.

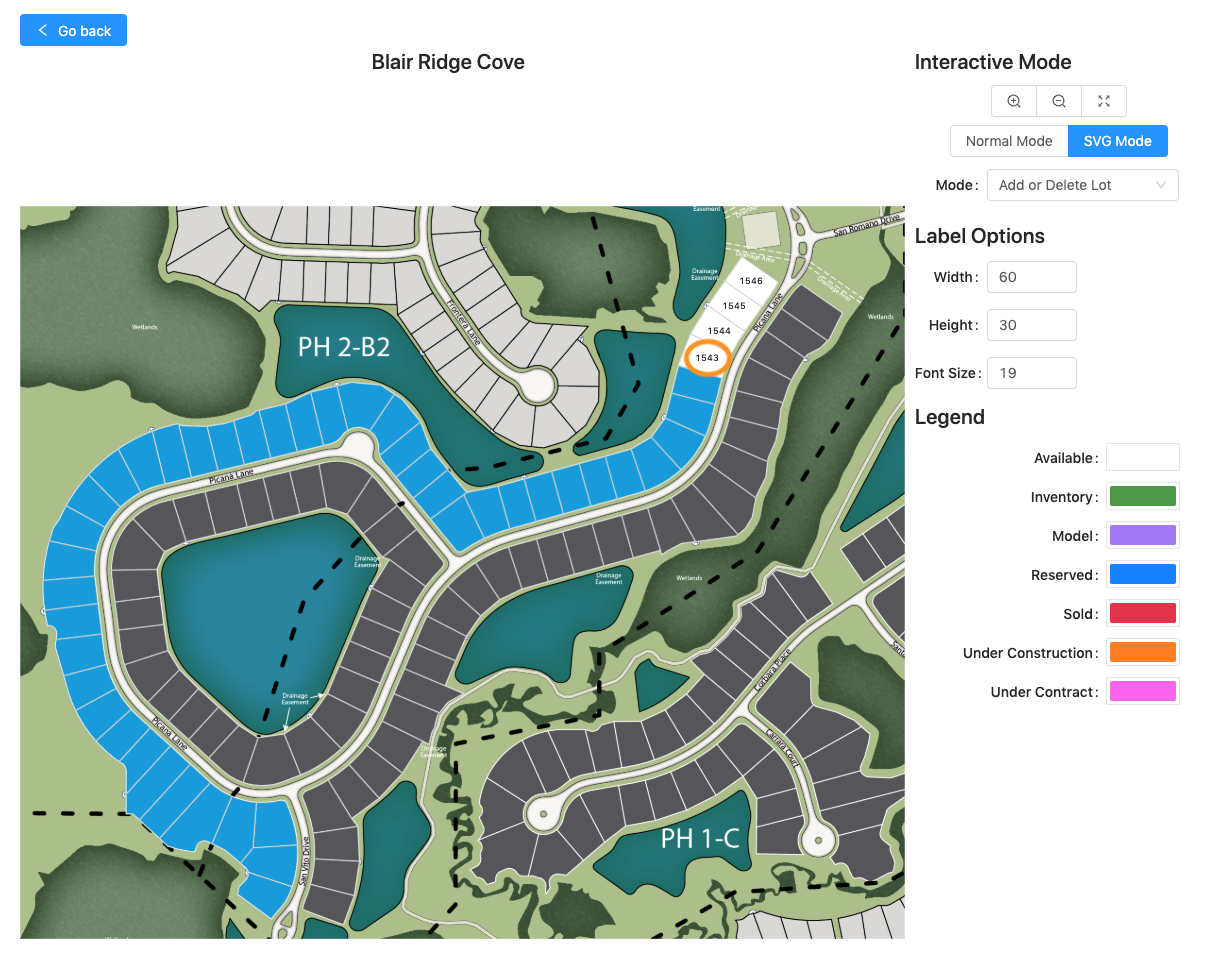
- Over to the right, you will notice zoom in/zoom out and fit to view buttons. Under those is “Normal Mode” and “SVG Mode.” SVG Mode is the view where your lots will display a shaded piano-key-style when you hover over them. Normal Mode is a standard view where the lots do not change shades, but you can still interact with them.


- If you have an SVG siteplan, you must add your new lots to that mode. Use the dropdown menu under “SVG Mode” to select “Add or Delete Lot”

- Find the location of the lot on the map and click on it. Add your lot name and check the “Add Inventory” box. (Note: the data name is entered when our team designs the SVG map. Labeling it the same number is a good practice for consistency, but not required.) When done, click “Submit”

- You can see your new lot on the map now.

- If you do not have an SVG, you can add a lot in “Normal Mode.” Make sure “Add or Delete Lot” is selected in the dropdown menu.

- Click the location of the lot on the map and a window will pop up. Add your lot name and check the “Add Inventory” box. When done, click “Submit” (Note: you can add inventory at a later date within the lot if you do not check off the box now)

- The lot now appears in the map. However, the label is off. You can edit that by selecting “Move Annotations” in the dropdown menu.

- Click and drag the label to its new position. You can also edit the label using the “Label Options” on the right. You can adjust the width and height of the label box along with the font size.

- Now, here is the reason you should add lots in SVG Mode if you have an SVG map. When you add the lot in “Normal Mode” it will not appear on the SVG map. (If you end up adding your lots in normal mode and realize you need them to appear on your SVG map, there is a work around – see step 14)


- When you add a lot to your siteplan map, it will also be added to the Home Sites list at the bottom of the page. Here you can edit details about your lots like sales status, address, premium, etc. You can see the detailed tutorials about this Home Sites list here. (link attached)

- Clicking the plus sign on the left of a lot in the list will expand the field for each lot. Click on “Inventory” – this is the area that is populated from checking the “Add Inventory” box when you add a new lot.

- The Home Sites list is also where you can make sure a lot you added in “Normal Mode” can also show up on your SVG map.
- First, note the SVG data name. (You can find it by following steps 4 & 5)

- Then click “Lot Details” in the expanded Home Sites list.

- Enter the Data Name.

- Now your lot will show on your SVG map!
- You may notice the blue “Add Lot” button above the Home Sites list. While you can add a lot using that button, we do not recommend it. When you add a lot from that button it does not assign a location in the siteplan map, so you would need to click and drag it and more importantly it will not link to your SVG map at all.

- There are 3 ways to delete a lot.
- In Normal Mode, make sure you select “Add or Delete Lot” in the dropdown menu. Then click on the lot you want to delete. A small window will pop up to confirm if you wish to delete it or not.


- In SVG Mode, make sure you select “Add or Delete Lot” in the dropdown menu. Then click on the lot you want to delete. A small window will pop up to confirm if you wish to delete it or not.


- From Home Sites list, click the red trash can icon to the right. A small window will pop up to confirm if you wish to delete it or not.


- IMPORTANT! Changes to your siteplans affect BOTH the My Home App (Siteplan) and Sales Center App (Homesites).


Please note: the Sales Center App mentioned above is an additional cost/upgrade. Please contact your Account Manager for more details.